GALERIA FOTOGRAFICA

Todas las fotos de familia, amigos y eventos realizados por los grupos al cual pertenesco estan en este segmento...

miércoles, 20 de mayo de 2020

How To Install And Run Backtrack On Android

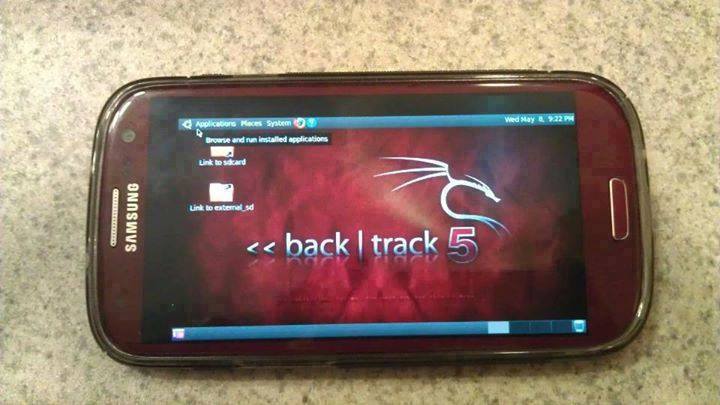
Guide you step by step to How to install and run Backtrack on android. As the Backtrack is also available with ARM architecture which makes it possible to run Backtrack on an ARM machine such as mobiles or tablets.
Recently, We are discussed Install and Run BackTrack on Windows. Android is the best OS for penetration testing. It designed for digital forensics and penetration testing or hacking tool. It comes with many more updated tools. As the Backtrack is also available with ARM architecture which makes it possible to run Backtrack on an ARM machine such as mobiles or tablets.
How To Install and Run Backtrack On AndroidRequirements
Step to Install and Run Backtrack On Android:
First of all extract the BT5-GNOME-ARM.7z. and copy the "BT5" folder and then put in your phone's root directory. Here mine phone is /sdcard. The root directory is different for different mobile devices.
  • Now install all the above apps Busybox, Android Terminal, Android Vnc.
  • After installing BusyBox application open it and wait until it finishes loading and then click on Smart install.
  • Now open the android terminal and type the following command:
    su cd /sdcard/BT5sh bootbtNOTE :- When you type su in terminal it will ask you for superuser request and you have to tap on Grant.
  • After this, type the following commands in terminal.
    export USER=rootvncpasswd
  • After entering vncpasswd the terminal will ask you to enter the password. Enter the desired password and hit enter.
  • Now type the following commands.
    tightvncserver -geometry 1280×720
  • The terminal emulator will create the localhost to connect it to VNC server. Now note the localhost port marked red below. Now minimize the terminal emulator.
  • Open the Android VNC and type the following settings.
Nickname : BT5
Password : your password here which you entered in terminal (step no.6)
Address : localhost
Port : 5906
NOTE: Make sure that your localhost's port matches with terminal's localhost. Here mine New 'X' desktop is localhost:6. You may be different. So, in VNC type Port 590X where the "X" is the localhost in the android terminal.
That's it now just tap on connect to run the Backtrack on your android. So in this way you successfully install and run backtrack 5 on android. If you face any problem feel free to discuss in below comments!

Related links


Read more...

WHY WE DO HACKING?

Purpose of Hacking?
. Just for fun
.Show-off
.Steal important information 
.Damaging the system
.Hampering Privacy
.Money Extortion 
.System Security Testing
.To break policy compliance etc

Continue reading

Read more...

martes, 19 de mayo de 2020

Memcrashed DDoS Exploit | Install | Github

Related word

  1. Geekprank Hacking
  2. Hacking Madrid
  3. Hacking Marketing
  4. 101 Hacking
  5. Hacker Significado
  6. Como Empezar A Hackear
  7. Hacking Games Online
  8. Hacking Definition
  9. Reddit Hacking
  10. Ingeniería Social. El Arte Del Hacking Personal Pdf
  11. Hacking Etico Que Es
  12. Crack Definicion
  13. Aprender Seguridad Informatica
  14. Chema Alonso Wikipedia

Read more...

The RastaLabs Experience

Introduction


It was 20 November, and I was just starting to wonder what I would do during the next month. I had already left my previous job, and the new one would only start in January. Playing with PS4 all month might sound fun for some people, but I knew I would get bored quickly.

Even though I have some limited red teaming experience, I always felt that I wanted to explore the excitement of getting Domain Admin – again. I got my first DA in ˜2010 using pass-the-hash, but that was a loooong time ago, and things change quickly.
While reading the backlogs of one of the many Slack rooms, I noticed that certain chat rooms were praising RastaLabs. Looking at the lab description, I felt "this is it, this is exactly what I need." How hard could it be, I have a whole month ahead of me, surely I will finish it before Christmas. Boy, was I wrong.


The one-time fee of starting the lab is 90 GBP which includes the first month, then every additional month costs 20 GBP. I felt like I was stealing money from Rastamouse and Hackthebox... How can it be so cheap? Sometimes cheap indicates low quality, but not in this case.


My experience


Regarding my previous experience, I already took OSCP, OSCE, SLAE (Securitytube Linux Assembly Expert), and PSP (Powershell for Pentesters), all of which helped me a lot during the lab. I also had some limited red teaming experience. I had more-than-average experience with AV evasion, and I already had experience with the new post-exploit frameworks like Covenant and Powershell Empire. As for writing exploits, I knew how a buffer overflow or a format string attack worked, but I lacked practice in bypassing ASLR and NX. I basically had zero experience with Mimikatz on Windows 10. I used Mimikatz back in 2012, but probably not since. I also had a lot of knowledge on how to do X and Y, on useful tools and hot techniques, but I lacked recent experience with them. Finally, I am usually the last when it comes to speed in hacking, but I have always balanced my lack of speed with perseverance.

RastaLabs starts in 3,2,1 ...


So I paid the initial entry fee, got the VPN connection pack, connected to the lab, and got my first flag after ... 4 days. And there were 17 of them in total. This was the first time I started to worry. I did everything to keep myself on the wrong track, stupid things like assuming incorrect lab network addresses, scanning too few machines, finding the incorrect breadcrumbs via OSINT, trying to exploit a patched web service (as most OSCPers would do), etc. I was also continually struggling with the tools I was using, as I never knew whether they were buggy, or I was misusing them, or this is just not the way to get the flag. I am sure someone with luck and experience could have done this stage in 2-3 hours, but hey, I was there to gain experience.

During the lab, whenever I got stuck with the same problem for more than 30-40 hours and my frustration was running high, I pinged Rastamouse on the official RastaLabs support channel on https://mm.netsecfocus.com/. I usually approached him like "Hi, I tried X, Y, and Z but no luck", then he replied "yeah, try Y harder". This kind of information was usually all I needed, and 2-3 hours later I was back on track again. His help was always enough, but never too much to spoil the fun. The availability and professionalism of Rastamouse was 10/10. Huge multi-billion dollar companies fail to provide good enough support, this one guy here was always there to help. Amazing. I highly recommend joining the Mattermost channel – it will help you a lot to see that you are not the only one stuck with problems. But please do not DM him or the channel if you have not already tried harder.

What's really lovely in the lab is that you can expect real-world scenarios with "RastaLabs employees" working on their computer, reading emails, browsing the web, etc. I believe it is not a spoiler here that at some point in time you have to deliver malware that evades the MS Defender AV on the machine. Yes, there is a real working Defender on the machines, and although it is a bit out of date, it might catch your default payload very quickly. As I previously mentioned, luckily I had recent experience with AV evasion, so this part was not new to me. I highly recommend setting up your own Win10 with the latest Defender updates and testing your payload on it first. If it works there, it will work in the lab. This part can be especially frustrating, because the only feedback you get from the lab is that nothing is happening, and there is no way to debug it. Test your solution locally first.

Powershell Empire turned out to be an excellent solution for me, the only functionality it lacked was Port Forwarding. But you can drop other tools to do this job efficiently.

A little help: even if you manage to deliver your payload and you have a working C&C, it does not mean your task with AV evasion is over. It is highly probable that Defender will block your post-exploit codes. To bypass this, read all the blog posts from Rastamouse about AMSI bypass. This is important.

Lateral movement


When you finally get your first shell back ...


A whole new world starts. From now on, you will spend significant time on password cracking, lateral movement, persistence, and figuring out how Windows AD works.
In the past, I played a lot of CTF, and from time to time I got the feeling "yeah, even though this challenge was fun, it was not realistic". This never happened during RastaLabs. All the challenges and solutions were 100% realistic, and as the "Ars poetica" of RastaLabs states:


...which is sooooo true. None of the tasks involve any exploit of any CVE. You need a different mindset for this lab. You need to think about misconfigurations, crackable passwords, privilege abuse, and similar issues. But I believe this lab is still harder to own than 90% of the organizations out there. The only help is that there are no blue-teamers killing our shells.

About the architecture of the lab: When connecting to the lab with VPN, you basically found yourself in a network you might label as "Internet", with your target network being behind a firewall, just as a proper corporate network should be.
There are a bunch of workstations – Win10 only, and some servers like fileserver, exchange, DC, SQL server, etc. The majority of servers are Windows Server 2016, and there is one Linux server. The two sites are adequately separated and firewalled.

As time passed, I was getting more and more flags, and I started to feel the power. Then the rollercoaster experience started. I was useless, I knew nothing. Getting the flag, I was god. One hour later, I was useless.


For example, I spent a significant amount of time trying to get GUI access to the workstations. In the end, I managed to get that, just to find out I did not achieve anything with it. For unknown reasons, none of the frameworks I tried had a working VNC, so I set up my own, and it was pain.

On December 18, I finally got Domain Admin privileges. So my estimation to "finish the lab" in one month was not that far off. Except that I was far from finishing it, as I still had to find five other flags I was missing. You might ask "you already have DA, how hard could it be to find the remaining five?". Spoiler alert, it was hard. Or to be more precise, not hard, just challenging, and time-consuming. This was also a time when connections on Mattermost RastaLabs channel helped me a lot. Hints like "flag X is on machine Y" helped me keep motivated, yet it did not spoil the fun. Without hints like this, I would not have written this post but would have been stuck with multiple flags.

About exploitation


And there was the infamous challenge, "ROP the night away." This was totally different from the other 16. I believe this image explains it all:


If you are not friends with GDB, well, you will have a hard time. If you don't have lots of hands-on experience with NX bypass - a.k.a ROP - like me, you will have a hard time with this challenge. The binary exploit challenges during OSCP and OSCE exams are nowhere near as complex as this one. If you have OSEE, you will be fine. For this challenge, I used GDB-Peda and Python pwntools – check them out in case you are not familiar with them. For me, solving this challenge took about 40 hours. Experienced CTF people could probably solve it in 4 hours or less.

Conclusion


I would not recommend taking this lab for total beginners *. I also do not recommend doing the lab if you only have limited time per day, which is especially true if you are working on your home computer. I probably would have saved hours or even days if I had set up a dedicated server in the cloud for this lab. The issue was that the lab workstations were rebooted every day, which meant that I always lost my shells. "Persistence FTW", you might say, but if your C&C is down when the workstation reboots, you are screwed. "Scheduled tasks FTW", you might say, but unless you have a strict schedule on when you start your computer, you will end up with a bunch of scheduled tasks just to get back the shell whenever you start your computer. Day after day I spent the first hour getting back to where I had been the day before. And I just figured out at the end of the lab why some of my scheduled tasks were not working ...

I would be really interested to see how much time I spent connected to the lab. Probably it was around 200–250 hours in total, which I believe is more than I spent on OSCP and OSCE combined. But it was totally worth it. I really feel the power now that I learned so many useful things.

But if you consider that the price of the one-month lab is 20 GBP, it is still a very cheap option to practice your skills. 
* It is totally OK to do the lab in 6 months, in case you start as a beginner. That is still just 190 GBP for the months of lab access, and you will gain a lot of experience during this time. You will probably have a hard time reaching the point when you have a working shell, but it is OK. You can find every information on Google, you just need time, patience and willingness to get there.

Anyway, it is still an option not to aim to "get all the flags". Even just by getting the first two flags, you will gain significant experience in "getting a foothold". But for me, not getting all the flags was never an option.


If you are still unconvinced, check these other blog posts:

Or see what others wrote about RastaLabs.


Footnote


In case you start the lab, please, pretty please, follow the rules, and do not spoil the fun for others. Do not leave your tools around, do not keep shared drives open, do not leave FLAGs around. Leave the machine as it was. If you have to upload a file, put it in a folder others won't easily find. This is a necessary mindset when it comes to real-world red teaming. Don't forget to drop a party parrot into the chat whenever you or someone else gets a new flag. And don't forget:
OSCP has no power here. Cry harder!

I will probably keep my subscription to the lab and try new things, new post-exploit frameworks. I would like to thank @_rastamouse for this great experience, @superkojiman for the ROP challenge. Hackthebox for hosting the lab with excellent uptime.
As for @gentilkiwi and @harmj0y, these two guys probably advanced red-teaming more than everyone else combined together. pwntools from @gallopsled was also really helpful. And I will be forever grateful to Bradley from finance for his continuous support whenever I lost my shells.

Continue reading


  1. Hacking 101
  2. Google Hacking Database
  3. Hacking Iphone
  4. Hacking Marketing
  5. Seguridad Y Hacking
  6. Hackers Informaticos Contactar
  7. Hacking Mifare
  8. Hacking Web Sql Injection Pdf
  9. Hacking Wallpaper
  10. Hacking Net
  11. Que Significa Hat
  12. Live Hacking
  13. Hackers Informaticos Contactar

Read more...

How To Repair A Crashed SD Card And Protect Your Data

One of the many reasons users prefer Android devices is the ability to expand the amount of available storage space using the MicroSD Card. Since we have the ability add up to 256GB of external storage to Android devices today, you're bound to choke up when the SD card crashes without any tell-tale signs.
If you're experiencing issues on how to repair a crashed SD card on your Android device, there are certain fixes you can try out. Since there's not a singular solution to SD Card issues, we've created a guide to help you detect the issue with your external storage and mentioned multiple solutions to get your SD card working and even retrieve your stored data along with it.


Before you start

Don't format the card if you want to retain any of the photos on it. You can follow the tips in our separate article on how to format a write-protected SD card after you've tried to recover any files that are on your card.

Now, try and find a different card reader. If you've inserted an SD card into your laptop or PC's built-in slot and nothing happens, try using a different computer or a USB card reader.
Sometimes it's the reader at fault – not the card. You can buy a USB SD card reader online for just a couple of pounds which will accept both microSD and standard SD cards.

Steps to Repair a Crashed SD Card and Protect your Data:

Step 1 – Physically clean the SD Card

Despite being durable and built to last, SD cards are prone to crashing sometimes due to physical damage. Since you carry your phone around everywhere, some dirt and dust are bound to fill up in the cracks, that can make SD card stop working from time to time.
The first thing you can try to do on how to repair a crashed SD card is physically scrub and clean it.
  • Remove the MicroSD card from your Android device and place it on a clean surface. Make sure that you turn off your phone before pulling out the SD card for safety.
  • Flip the MicroSD card and using a white eraser, gently scrub the gold contact pins of the SD card to get rid of any residual dirt or grime.
  • If you have an alcohol-based cleaning solution or even nail polish remover around, dab it on to the connector pins using a Q-tip and gently rub it.
Once the SD card has dried out, you can plug it back into your Android device and turn it on to see if the solution has worked.


Step 2 – Format the SD Card

If your SD card is being detected by the Android device but you're having trouble accessing the saved files, there's a good chance that the files are corrupt. This could either be due to a particular broken file in the saved storage, or a virus that is causing the issue.
Either way, the only option there is left for you to try out is make the SD card reusable for formatting it.
  • From the home screen of your Android device, head over to the Settings app and then scroll down to find the Storage
  • In the Storage tab, you'll be able to find the Erase SD Card option, so go ahead and select it.
  • Confirm your action to delete all of the files and folders stored on your SD card and this should effectively solve the issue.

Step 3 – Check the SD card compatibility

If you are trying to figure out how to repair a crashed SD card on an older Android device, you might just need to look at the details more carefully. If your SD card fails to be recognized on the mobile device but works with your computer, the problem could be related to compatibility.
  • If the MicroSD card that you are trying to use with your older phone is SDXC version (built for higher transfer speeds), it will not be recognized.
  • Look up the maximum capacity of expandable storage that is supported by your device, since they can vary from starting at 64GB to all the way up to 256GB.

Step 4 – Diagnose the SD card using a PC

If a simple format did not help you solve the SD card problem, you might need a more technical analysis of the issue. To do so, you can plug in your SD card into a computer and use the diagnostic tools to find out the pertaining errors and effectively fix them.
  • Connect your Android mobile device to a computer using a USB cable.
  • Make sure that you connect Android as MSC (Mass storage mode) and not MTP (Media transfer mode). You can do this using the notification menu once you connect the phone to your computer.
  • Launch the Windows Explorer and right click on the SD card driver you see on the screen. In the options menu, choose Properties – Tools – Error Checking and wait for the entire process to complete.
  • The computer will try to update the software for your SD card and fix any errors that are causing it to crash.

Step 5 – Use chkdsk to fix/repair a corrupted SD card without data loss

The "chkdsk" command is your first choice for damaged SD card repair. Requiring no format, it allows you to fix or repair a corrupted SD card and regain access to all your important files on the device. Let's see how it works. (I'm using Windows 7 for this demonstration)
1. Plug in your SD card to your computer with a card reader.
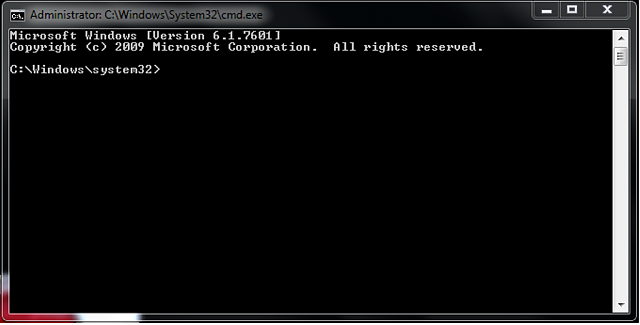
2. Go to the start menu, type in "cmd" in a search bar, hit enter and then you can see something named "cmd. exe" in a list of programs.
3. Right-click "cmd. exe" and then you will get the following command windows that allow you to fix your corrupted SD card without formatting.
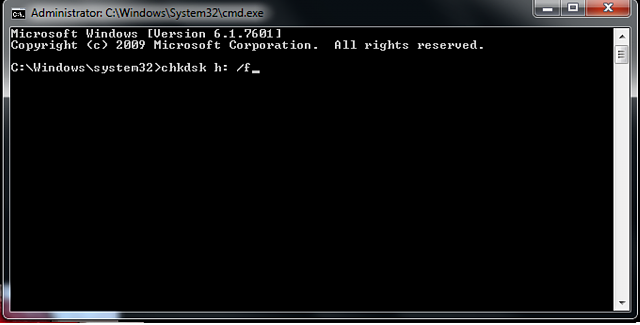
4. Type in "chkdsk /X /f sd card letter:" or "chkdsk sd card letter: /f ", for example,"chkdsk /X /f G:" or "chkdsk h: /f".
After finishing all the steps, Windows will have checked and fixed the file system of the SD card. It usually takes several minutes. After that, if you see "Windows has made corrections to the file system" in the command window, then congratulations! The damaged SD card is successfully fixed and you can see your data again. If not, you should try a third-party data recovery software to retrieve your files from the damaged SD card and repair it by formatting.
Once the process has been completed, you can go ahead and pop the SD card back into your Android device and see if the issue has been resolved.

Step 6 : Use EaseUS Data Recovery Wizard to recover data from damaged SD card

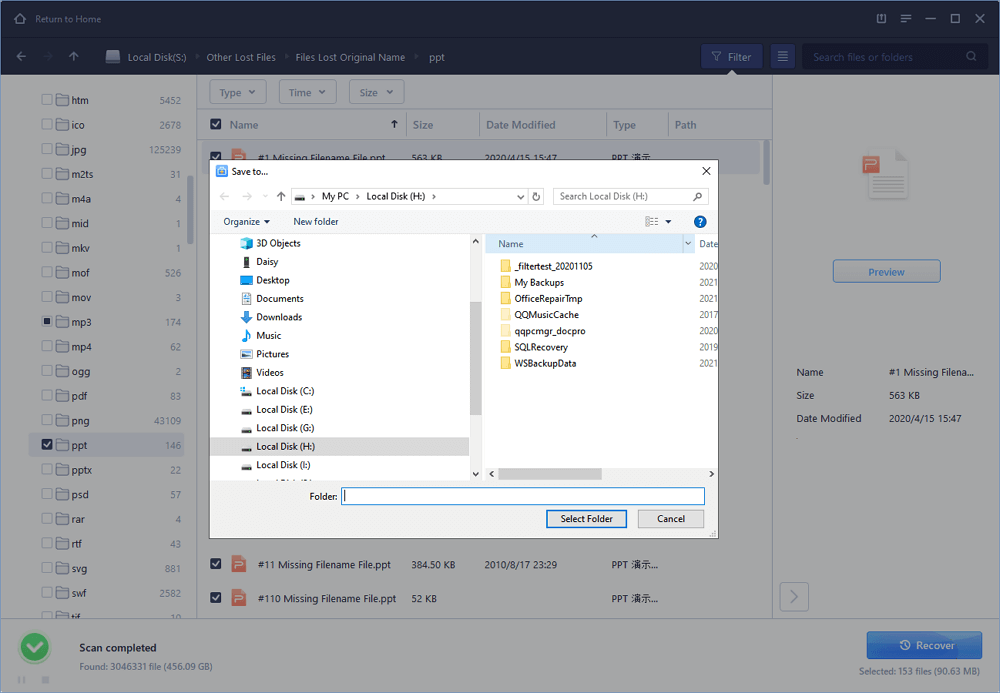
1. Connect the corrupted SD card to your PC, launch EaseUS's data recovery software, select the card and click "Scan".
2. A quick scan will first start to search all the lost and existing data on the SD card. And after that, a deep scan will automatically launch in order to find more files.
3. After the scan, choose those files you want to recover and click the "Recover" button to retrieve them back.

Final Words :

So finally through this article, you have got to know about the method by which the SD card could be repaired and hence the data in it could be saved for the further access. We have tried to present the method in easy to grab manner and we believe that you could possibly get to know about it easily. Hope that you would have liked the information in this post, if it is so then please share it with others. Also, do not forget to share the post with others, let most of the people know about the method. Share your comments about the post through using the comment box below. At last never the fewer thanks for reading this post!

More info


Read more...

lunes, 18 de mayo de 2020

Top 10 Most Popular Ethical Hacking Tools (2019 Ranking)

     Top 10 powerful Hacking  Tools in 2019.       

If hacking is performed to identify the potential threats to a computer or network then it will be an ethical hacking.

Ethical hacking is also called penetration testing, intrusion testing, and red teaming.

Hacking is the process of gaining access to a computer system with the intention of fraud, data stealing, and privacy invasion etc., by identifying its weaknesses.

Ethical Hackers:

A person who performs the hacking activities is called a hacker.

There are six types of hackers:

  • The Ethical Hacker (White hat)
  • Cracker
  • Grey hat
  • Script kiddies
  • Hacktivist
  • Phreaker

A security professional who uses his/her hacking skills for defensive purposes is called an ethical hacker. To strengthen the security, ethical hackers use their skills to find vulnerabilities, document them, and suggest the ways to rectify them.

Companies that provide online services or those which are connected to the internet, must perform penetration testing by ethical hackers. Penetration testing is another name of ethical hacking. It can be performed manually or through an automation tool.

Ethical hackers work as an information security expert. They try to break the security of a computer system, network, or applications. They identify the weak points and based on that, they give advice or suggestions to strengthen the security.

Programming languages that are used for hacking include PHP, SQL, Python, Ruby, Bash, Perl, C, C++, Java, VBScript, Visual Basic, C Sharp, JavaScript, and HTML.

Few Hacking Certifications include:

  1. CEH
  2. GIAC
  3. OSCP
  4. CREST

Let's Explore!!

#1) Nmap

Nmap

Price: Free

Description:

Nmap is a security scanner, port scanner, as well as a network exploration tool. It is an open source software and is available for free.

It supports cross-platform. It can be used for network inventory, managing service upgrade schedules, and for monitoring host & service uptime. It can work for a single host as well as large networks. It provides binary packages for Linux, Windows, and Mac OS X.

Features: 

  • Nmap suite has:
    • Data transfer, redirection, and debugging tool(Ncat),
    • Scan results comparing utility(Ndiff),
    • Packet generation and response analysis tool (Nping),
    • GUI and Results viewer (Nping)
  • Using raw IP packets it can determine:
    • The available hosts on the network.
    • Their services offered by these available hosts.
    • Their OS.
    • Packet filters they are using.
    • And many other characteristics.

Best for: Nmap is best for scanning network. It is easy to use and fast as well.

Website: Nmap

******************

#2) Netsparker

Netsparker Vulnerability-Assessments-and-Penetration-Tests

Netsparker is a dead accurate ethical hacking tool, that mimics a hacker's moves to identify vulnerabilities such as SQL Injection and Cross-site Scripting in web applications and web APIs. 
 
Netsparker uniquely verifies the identified vulnerabilities proving they are real and not false positives, so you do not need to waste hours manually verifying the identified vulnerabilities once a scan is finished.
 
It is available as a Windows software and an online service.

******************

#3) Acunetix 

Acunetix Dashboard

Acunetix is a fully automated ethical hacking tool that detects and reports on over 4500 web application vulnerabilities including all variants of SQL Injection and XSS.

The Acunetix crawler fully supports HTML5 and JavaScript and Single-page applications, allowing auditing of complex, authenticated applications.

It bakes in advanced Vulnerability Management features right-into its core, prioritizing risks based on data through a single, consolidated view, and integrating the scanner's results into other tools and platforms.

=> Visit Acunetix Official Website

******************

#4) Metasploit

Metasploit

Price: Metasploit Framework is an open source tool and it can be downloaded for free. Metasploit Pro is a commercial product. Its free trial is available for 14 days. Contact the company to know more about its pricing details.

Description:


It is the software for penetration testing. Using Metasploit Framework, you can develop and execute exploit code against a remote machine. It supports cross-platform.

Features: 

  • It is useful for knowing about security vulnerabilities.
  • Helps in penetration testing.
  • Helps in IDS signature development.
  • You can create security testing tools.

Best For Building anti-forensic and evasion tools.

Website: Metasploit

#5) Aircrack-Ng

aircrack-ng

Price: Free

Description:

Aircrack-ng provides different tools for evaluating Wi-Fi network security.

All are command line tools. For Wi-Fi security, it focuses on monitoring, attacking, testing, and cracking. It supports Linux, Windows, OS X, Free BSD, NetBSD, OpenBSD, Solaris, and eComStation 2.

Features:


  • Aircrack-ng can focus on Replay attacks, de-authentication, fake access points, and others.
  • It supports exporting data to text files.
  • It can check Wi-Fi cards and driver capabilities.
  • It can crack WEP keys and for that, it makes use of FMS attack, PTW attack, and dictionary attacks.
  • It can crack WPA2-PSK and for that, it makes use of dictionary attacks.

Best For: Supports any wireless network interface controller.

Website: Aircrack-Ng

#6) Wireshark

Wireshark

Price: Free

Description:

Wireshark is a packet analyzer and can perform deep inspection of many protocols.

It supports cross-platform. It allows you to export the output to different file formats like XML, PostScript, CSV, and Plaintext. It provides the facility to apply coloring rules to packet list so that analysis will be easier and quicker. The above image will show the capturing of packets.

Features:

  • It can decompress the gzip files on the fly.
  • It can decrypt many protocols like IPsec, ISAKMP, and SSL/TLS etc.
  • It can perform live capture and offline analysis.
  • It allows you to browse the captured network data using GUI or TTY-mode TShark utility.

Best For: Analyzing data packets.

Website: Wireshark

#7) Ettercap

Ettercap

Price: Free.

Description:

Ettercap supports cross-platform. Using Ettercap's API, you can create custom plugins. Even with the proxy connection, it can do sniffing of HTTP SSL secured data.

Features:

  • Sniffing of live connections.
  • Content filtering.
  • Active and passive dissection of many protocols.
  • Network and host analysis.

Best For: It allows you to create custom plugins.

Website: Ettercap

#8) Maltego

Maltego

Price: The Community version, Maltego CE is available for free. Price for Maltego Classic is $999. Price for Maltego XL is $1999. These two products are for the desktop. Price for the server products like CTAS, ITDS, and Comms starts at $40000, which includes training as well.

Description:

Maltego is a tool for link analysis and data mining. It supports Windows, Linux, and Mac OS.

For the discovery of data from open sources and visualizing the information in graphical format, it provides the library of transforms. It performs real-time data-mining and information gathering.

Features:

  • Represents the data on node-based graph patterns.
  • Maltego XL can work with large graphs.
  • It will provide you the graphical picture, thereby telling you about the weak points and abnormalities of the network.

Best For: It can work with very large graphs.

Website: Maltego

#9) Nikto

Nikto

Price: Free

Description:

Nikto is an open source tool for scanning the web server.

It scans the web server for dangerous files, outdated versions, and particular version related problems. It saves the report in a text file, XML, HTML, NBE, and CSV file formats. Nikto can be used on the system which supports basic Perl installation. It can be used on Windows, Mac, Linux, and UNIX systems.

Features:

  • It can check web servers for over 6700 potentially dangerous files.
  • It has full HTTP proxy support.
  • Using Headers, favicons, and files, it can identify the installed software.
  • It can scan the server for outdated server components.

Best For: As a Penetration Testing tool.

Website: Nikto

#10) Burp Suite

BurpSuite

Price: It has three pricing plans. Community edition can be downloaded for free. Pricing for Enterprise edition starts at $3999 per year. Price of the Professional edition starts at $399 per user per year.

Description:

Burp Suite has a web vulnerability scanner and has advanced and essential manual tools.

It provides many features for web application security. It has three editions, community, enterprise, and professional. With community editions, it provides essential manual tools. With the paid versions it provides more features like Web vulnerabilities scanner.

Features:

  • It allows you to schedule and repeats the scan.
  • It scans for 100 generic vulnerabilities.
  • It uses out-of-band techniques (OAST).
  • It provides detailed custom advisory for the reported vulnerabilities.
  • It provides CI Integration.

Best For: Security testing.

Website: Burp Suite

#11) John The Ripper

John-the-Ripper

Price: Free

Description:

John the Ripper is a tool for password cracking. It can be used on Windows, DOS, and Open VMS. It is an open source tool. It is created for detecting weak UNIX passwords.

Features:

  • John the Ripper can be used to test various encrypted passwords.
  • It performs dictionary attacks.
  • It provides various password crackers in one package.
  • It provides a customizable cracker.

Best For: It is fast in password cracking.

Website:  John the Ripper

#12) Angry IP Scanner

AngryIPScanner

Price: Free

Description:

Angry IP Scanner is a tool for scanning the IP addresses and ports. It can scan both on local network and Internet. It supports Windows, Mac, and Linux operating systems.

Features:

  • It can export the result in many formats.
  • It is a command-line interface tool.
  • It is extensible with many data fetchers.

Website:  Angry IP Scanner

Conclusion

As explained here, Nmap is used for computer security and network management. It is good for scanning the network. Metasploit is also for security and is good for building anti-forensic and evasion tools.

Aircrack-Ng is a free packet sniffer & injector and supports cross-platform. Wireshark is a packet analyzer and is good in analyzing data packets. As per the reviews available online, people recommend using Nmap instead of Angry IP scanner as Angry IP Scanner comes with unwanted applications.

John the Ripper is fast in password cracking. Nikto is a good open source tool for penetration testing. Maltego presents the data in a graphical form and will give you information about weak points and abnormalities.

This was all about the ethical hacking and the top ethical hacking tools. Hope you will find this article to be much useful!!

@EVERYTHING NT

Continue reading
  1. Growth Hacking Barcelona
  2. Curso Hacker
  3. Aprender Hacking Desde Cero
  4. Google Hacking Search
  5. Programa De Hacking
  6. Wifi Hacking
  7. Herramientas Growth Hacking
  8. Phishing Hacking
  9. Hacking Etico Libro
  10. Hacking Programs
  11. Hacking Basico
  12. Etica Definicion
  13. Black Hacker
  14. Hacking 101
  15. Hacking Wifi
  16. Rom Hacking

Read more...

How Do I Get Started With Bug Bounty ?

How do I get started with bug bounty hunting? How do I improve my skills?


These are some simple steps that every bug bounty hunter can use to get started and improve their skills:

Learn to make it; then break it!
A major chunk of the hacker's mindset consists of wanting to learn more. In order to really exploit issues and discover further potential vulnerabilities, hackers are encouraged to learn to build what they are targeting. By doing this, there is a greater likelihood that hacker will understand the component being targeted and where most issues appear. For example, when people ask me how to take over a sub-domain, I make sure they understand the Domain Name System (DNS) first and let them set up their own website to play around attempting to "claim" that domain.

Read books. Lots of books.
One way to get better is by reading fellow hunters' and hackers' write-ups. Follow /r/netsec and Twitter for fantastic write-ups ranging from a variety of security-related topics that will not only motivate you but help you improve. For a list of good books to read, please refer to "What books should I read?".

Join discussions and ask questions.
As you may be aware, the information security community is full of interesting discussions ranging from breaches to surveillance, and further. The bug bounty community consists of hunters, security analysts, and platform staff helping one and another get better at what they do. There are two very popular bug bounty forums: Bug Bounty Forum and Bug Bounty World.

Participate in open source projects; learn to code.
Go to https://github.com/explore or https://gitlab.com/explore/projects and pick a project to contribute to. By doing so you will improve your general coding and communication skills. On top of that, read https://learnpythonthehardway.org/ and https://linuxjourney.com/.

Help others. If you can teach it, you have mastered it.
Once you discover something new and believe others would benefit from learning about your discovery, publish a write-up about it. Not only will you help others, you will learn to really master the topic because you can actually explain it properly.

Smile when you get feedback and use it to your advantage.
The bug bounty community is full of people wanting to help others so do not be surprised if someone gives you some constructive feedback about your work. Learn from your mistakes and in doing so use it to your advantage. I have a little physical notebook where I keep track of the little things that I learnt during the day and the feedback that people gave me.


Learn to approach a target.
The first step when approaching a target is always going to be reconnaissance — preliminary gathering of information about the target. If the target is a web application, start by browsing around like a normal user and get to know the website's purpose. Then you can start enumerating endpoints such as sub-domains, ports and web paths.

A woodsman was once asked, "What would you do if you had just five minutes to chop down a tree?" He answered, "I would spend the first two and a half minutes sharpening my axe."
As you progress, you will start to notice patterns and find yourself refining your hunting methodology. You will probably also start automating a lot of the repetitive tasks.

Related links
  1. Computer Hacking
  2. Windows Hacking
  3. Hacking Ético
  4. Hacking Growth Sean Ellis
  5. Libro De Hacking
  6. Hacking Etico Curso Gratis
  7. Hacking Ético
  8. Curso De Growth Hacking
  9. Cosas De Hackers
  10. Hacking Y Forensic Desarrolle Sus Propias Herramientas En Python Pdf
  11. Best Hacking Books

Read more...

  © Blogger templates ProBlogger Template by Ourblogtemplates.com 2008

Back to TOP